So I have been looking at FINALLY putting up DIY curtains in my office. I haven’t seen any pre-made curtains in stores that I love, so I’ve been searching on Etsy. I stumbled across some in a fabric by Waverly named “Santa Maria Desert Flower” and I dug them. They made me super happy but they were a little pricey, so I held off on buying them.
Then I saw my friend Lori from Vintage Charm Restored do a post that Hobby Lobby had that same fabric for sale. And you all know that Hobby Lobby and I are in a committed relationship, right? Like we are practically to the engagement stage!!!! So I was THERE the next day. If you do not have a Hobby Lobby near you, you can order this same fabric from my affiliate link with Online Fabric by going HERE.
I got to the “Hobbily Lobbily” as Ava calls it and I almost considered another fabric, but when I posted THIS VIDEO onto my newly renamed Facebook page, you all voted I stuck with my original love, so I did!
Next came the part of the DIY curtains project that I don’t do…. SEWING. I explained to the lady in the fabric department of Hobby Lobby that I haven’t used a sewing machine since Home Ec class in 1988. I think she wanted to cry on my behalf. Lol. I can tell you she didn’t know what to do with the likes of me, but she showed me my new best friend:
It’s Peel N’ Stick. PEEL N STICK you guys!!!! This singlehandedly REVOLUTIONALIZES “sewing” as we know it. We don’t even have to use IRON ON hem anymore for DIY curtains! Boom! Mind blown. (And again, my affiliate link with Online Fabric Store has this HERE, just search for Peel and Stick)
So I ran home from Hobby Lobby with all my supplies and stapled the fabric to my wall because when you are creative and decide you want something, you can’t wait for details like the “hanging up of curtain rods when husband gets home” and all that nonsense. So I stapled the panel right to the wall so that I could sit back and admire. And I knew I had made the right fabric selection for my DIY curtains!
I spread out in my kitchen to “sew” the curtains. I did cut the fabric in half. I had to borrow my neighbor Jody’s fabric shears because apparently it is frowned upon to cut fabric with crappy kitchen shears or craft scissors that have tried glue on them. They don’t cut pretty. So I borrowed decent shears.
Many of you asked why I cut the panels in half. Well, the fabric was expensive. It was $305 before the Hobby Lobby coupon, so I was NOT going to buy double the fabric because can you imagine Mr. Magic’s reaction to $610 of fabric??? Plus rods. Plus clips. Plus no-sew adhesive. I mean he adores me and all, but I don’t know that he or I is into $700 DIY curtains on this side of Heaven. #keepinitreal . The truth is I tire of things quickly so I know they won’t stay up forever and I’d rather save the money to buy other stuff to go into the room…. so it’s all good. I cut them in half. (and we had 4 panels that were 8 7/8 feet each for those of you good at converting feet into yards!)
Unfortunately though, when I cut the panels in half, I couldn’t do a big hem because I wanted them to stay as wide as possible. So if you look at my hem close, it’s narrower than my 11th grade Home Ec teacher would prefer. But hey, it’s done!
In typical DIY fashion, I ran out of the Peel N’ Stick before I got it all done, but we hung them up anyway because I didn’t want to wait until I got to the store to get more……
And I finished “hemming” them the next day…. while they were hung. Bahahhahhahaha. You guys, that is how I roll. I KNOW some of you operate exactly like this and there is no shame in our game. Come out and join the #hotmess revolution!
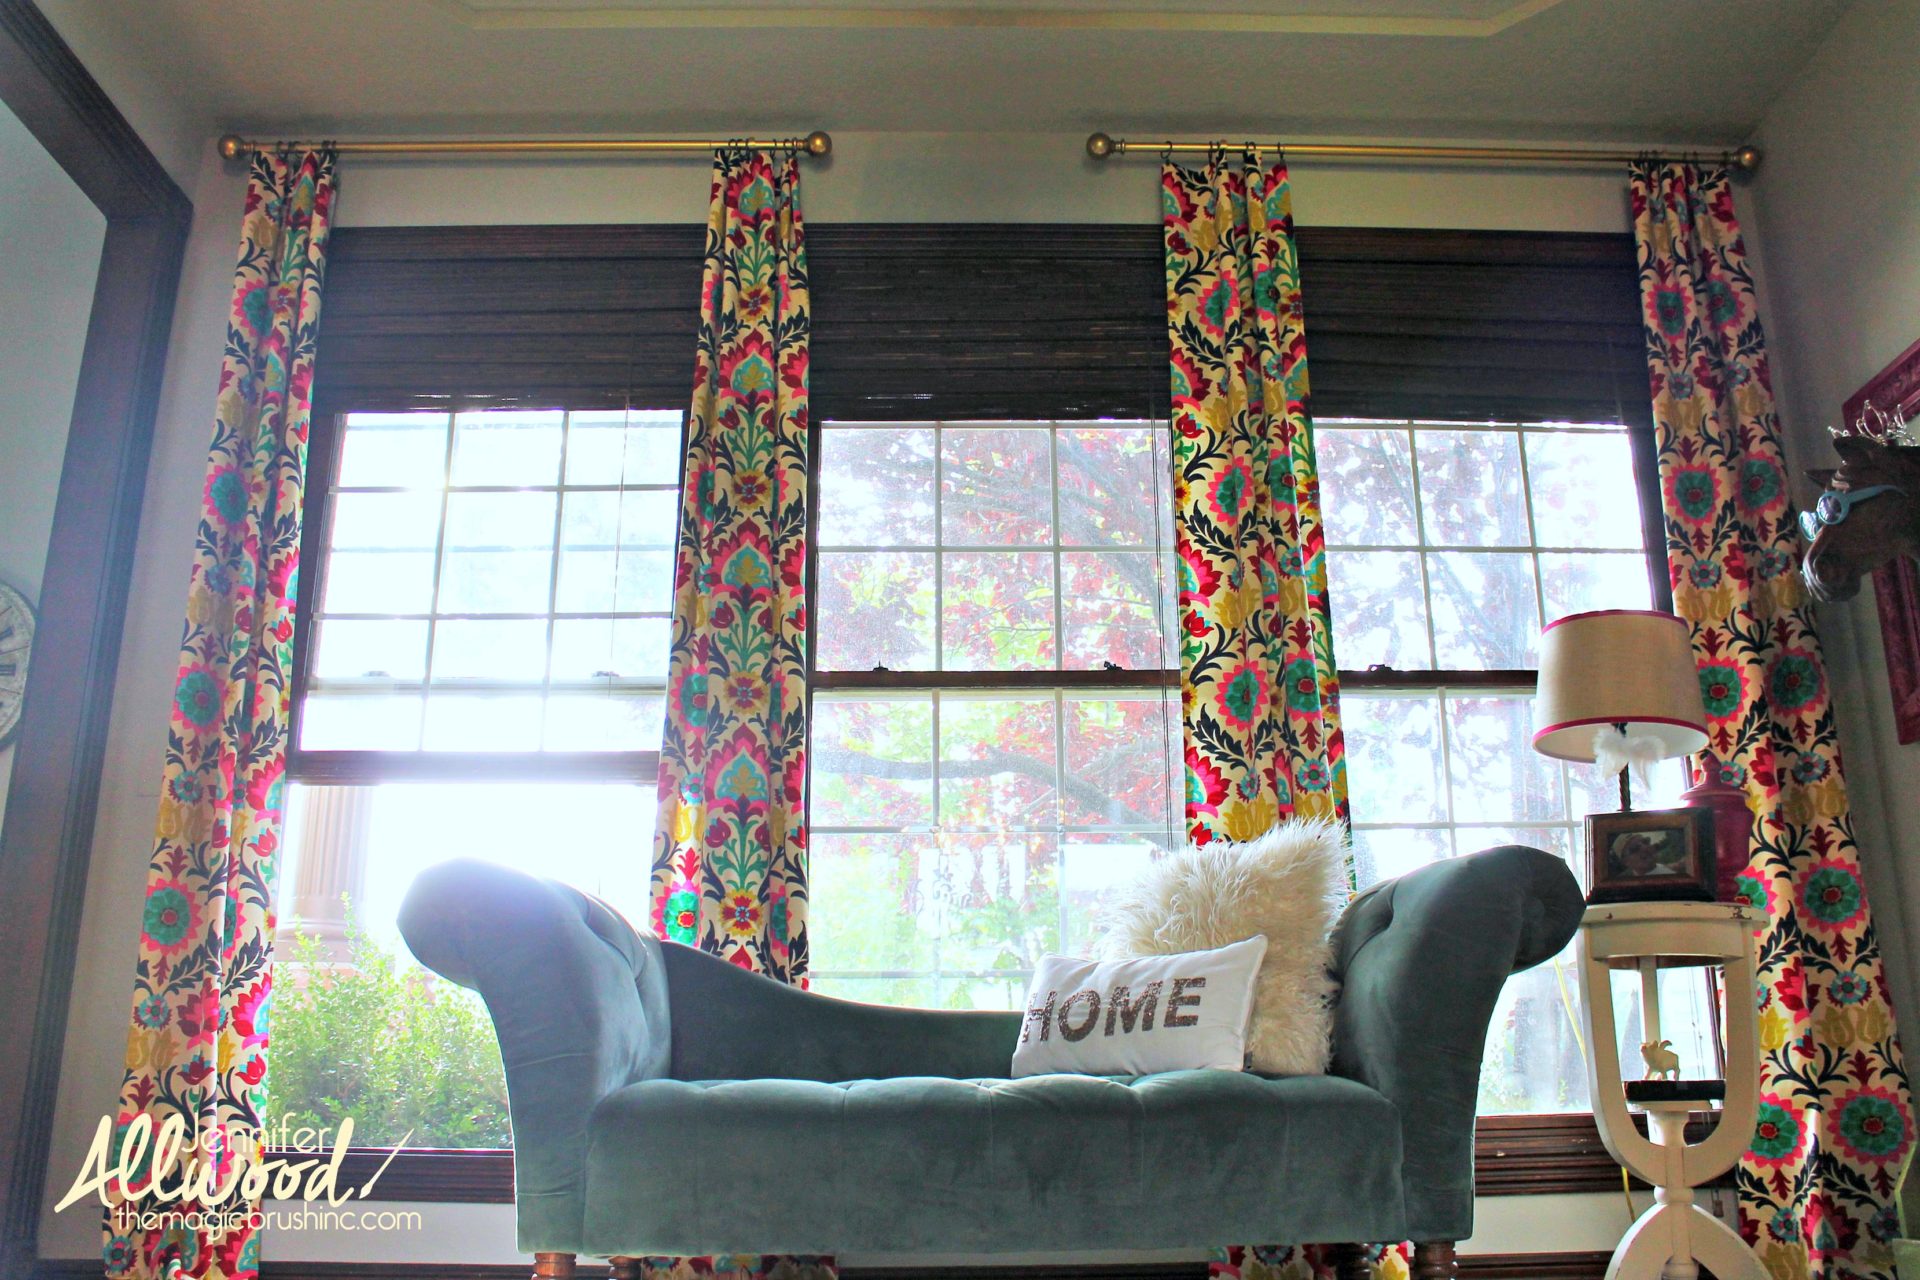
Our other dilemma came in on the curtain rods and Mr. Magic was the genius that solved it. Our window is wiiiiiiiiiiiiide and we needed a 12 foot rod to go across the top. Hobby Lobby didn’t have a 12 foot gold rod and again, I was wanting this project done YESTERDAY. So, I didn’t want to go shop for rods, or DIY some pipe into a rod or reinvent the wheel. Mr. Magic suggested we just use 2 of the short gold rods from Hobby Lobby and leave a gap in the middle and I promise you….. this is my favorite part of the entire DIY curtain project. It’s so fun and unexpected. Mr. Magic is genius. I should marry that man. (that’s a joke for you newcomers, we are very married).
And here is my office now. I will be blogging soon about how we also changed the silver on the chandelier to gold and how we accented my desk in gold too to bring the room together.
Until then, I thought you may enjoy a pic of how our kids like the new office look.
I think WWE wrestling is their way of giving us a thumbs up, don’t you?
Feel free to pin from the pics on this post!
If you want to see more at HAPPY prints, check out my new gray-patterned carpet I put on my stairs. It’s gorgeous! I also have some tips for painting fabric. If you have old ugly upholstery furniture, use this product to give it new life and bold color and turn it into HAPPY fabric.
Blessings,
Jennifer




11 comments
I was wondering the same thing about whether she punched holes in the top. These curtains are amazing! I love them.
They are clip on curtain rings! xoxo
Jennifer, these curtains are so cute! I have been wanting to get some curtains to put up around the house. It really can add a lot to a room! I will have to start looking for some nice curtains. I would love to have them in before the holidays!
I love this idea but how do you figure out how much fabric you need? I have the same 3 window wall but my windows are smaller. Thanks.
I love them! Bright and colorful makes me happy, too. I’m afraid I’m already married to Hobby Lobby. I tell my husband “I’m going to the Hob”. He knows.
Ok im so totally on your side. I love to sew but that hem tape is amazing huh? The fabric you choose really adds the pop of color you needed for the space plus the design is awesome! Love the fact you did all that with no sewing, no poking holes, just fabric, a good pair of fabric sheers lol, hemming tape and clips with rings! Easy peasy and looks like you paid an interior designer 2000.00 for window treatments! Great job and tutorial
i love them ،iwould like learn all of them
How wide was each panel?