Jennifer Allwood Home
  • Home
  • Amazon Picks
  • Shop my Instagram
  • New House
  • Old House
  • Hair
  • Recipes
  • Adoption
Jennifer Allwood Home
  • Home
  • All Posts
  • Amazon Picks
  • Shop My Instagram
  • Boujee on the Beach
  • Boujee in the Desert
  • Boujee on Miramar Beach
  • All Posts
  • Allwood
  • blog
  • jennifer-allwood-home
  • Our New Home Remodel

How to Gold Leaf a Ceiling

  • October 28, 2020
Total
3K
Shares
0
0
3K

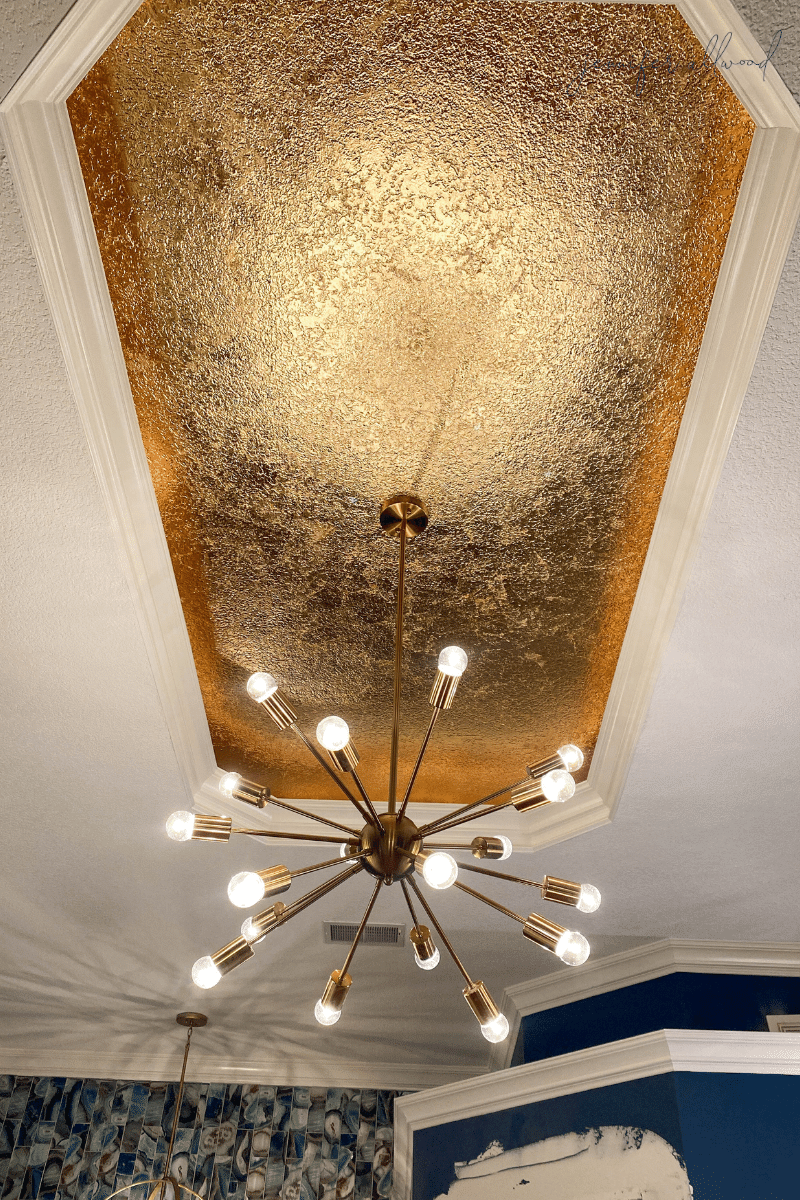
Back when I owned my decorative painting company, I was obsessed with gold leaf…and I’m still obsessed with gold leaf now.

We used to do a ton of silver leaf also, but now gold is so hot and I’m loving all things gold. I haven’t done any of the painting projects on the inside of my house since we moved here, but it’s #2020 and everything is different lately, so I decided to take the time to do it myself while we had our master bathroom remodeled—plus, I really wanted it to match the other gold fixtures in the bathroom. 

Gold leafing is VERY messy so I also wanted to make sure I did it all while we were still in the remodel process since clean up would be a TON easier. 

And I want to share my instructions with you!

First thing you have to do is roll Size on the entire surface whether it’s a wall, ceiling, or piece of furniture. (FYI- Size is the clear sticky products that allows the gold leafing to adhere to the surface of your project.) 

Let that dry for at least 30 minutes and then follow it up with a second coat just like the first coat—allowing it to set up for 30 minutes again. I do this because I’m always surprised but how many spots actually get missed and you don’t want to miss anything. When it’s “ready”, it will still feel sticky to the touch and you will hear almost a popping sound when you touch it and pull your finger off.

Once it’s ready, you are ready to begin leafing. 

Be sure to start in the corner that is least obvious and visible to the majority of the room—that way you can test it and get a good system down. If you have a flat surface, and want to see squares, you can apply it in perfect lines. But I have a California knockdown texture on this ceiling and if you have texture,  you’ll want to adhere it to the ceiling in different directions so it looks better when done.

I pick up each piece of leaf by leaving it “stuck” to the wax paper it comes on (there is paper between each piece of leaf). You can see in the photo above how it looks like when it’s shipped.

So you take the imitation gold leaf and hold the wax paper part so that you don’t rip the leaf and “lay” it on the ceiling. The leaf sticks to the ceiling and the white paper comes right back off in your hand.

After you have a section of your surface covered take a soft rag or an old sock and go in circular motions which will make all the flakey parts fall off. You can see in the picture above how I have smoothed the leaf out in the one corner and where I haven’t done it yet. If you see spots that you missed, you can re-add some of the Size (be sure to let it tack-up) and then adhere more gold leaf to that spot.

A lot of the gold leaf flakes to the floor so as I mentioned, it gets very messy so use drop cloth or preferably plastic that you can roll up and throw away when you’re finished. 

When you’re finished, you’re supposed to top coat it. And to be honest, I am not on my own project. Many people have asked me if I’m worried about the leaf tarnishing with the high humidity and I’m not—I kind of like living on the edge like that. 

But here is the product you can use to topcoat if you are concerned and want to follow the directions! ha!

The last step is to clean it up. You have a toooooon of mess to clean up. That’s the fun part—not! Lol

But the end result is so worth the mess! It’s so shiny and gold and over the top! I love it! Be sure to check back after our bathroom remodel is finished to see the final product with allllll the details! Stay tuned at instagram.com/jenniferallwoodhome to see the progress!

Watch the full process in this time-lapse video!

https://jawhome.wpengine.com/wp-content/uploads/2010/10/gold-leaf-video-720p.mp4


Xoxo,

Jen


*Pinterest lovers: Save this to your home remodel board!

Total
3K
Shares
Share 0
Tweet 0
Pin it 3K
Related Topics
  • ceiling
  • DIY
  • glitter
  • gold
  • home update
  • remodel
Jennifer Allwood

Previous Article
  • All Posts
  • blog
  • Color trends
  • decorating
  • Faith, Family, & Adoption
  • Fashion, Hair & Makeup
  • jennifer-allwood-home

My Curly Hair Styling Routine from Shower to Styled

  • October 22, 2020
Read More
Next Article
  • All Posts
  • Allwood
  • blog
  • decorating
  • DIY Projects
  • jennifer-allwood-home

50+ Best Bold and Neutral Paint Colors

  • November 3, 2020
Read More
You May Also Like
Read More
  • All Posts
  • blog
  • decorating
  • ja-home
  • jennifer-allwood-home
  • Uncategorized

Our HOT PINK Backyard Pool Remodel!

  • Jennifer Allwood
  • June 27, 2024
Read More
  • All Posts
  • Beach House
  • Florida Beach House
  • jennifer-allwood-home
  • Uncategorized

Using A Bike As Beach House Wall Decor

  • Jennifer Allwood
  • May 19, 2022
Read More
  • All Posts
  • Beach House
  • Florida Beach House
  • jennifer-allwood-home
  • Uncategorized

Laura Park Wallpaper In Our Non Beach Themed Beach House

  • Jennifer Allwood
  • May 11, 2022
Jennifer Allwood Master Bedroom Loft
Read More
  • All Posts
  • Beach House
  • Uncategorized

The Beach House Master Bedroom Loft Makeover

  • Jennifer Allwood
  • April 10, 2022
Jennifer Allwood Dutch Door
Read More
  • All Posts
  • blog
  • jennifer-allwood-home
  • Our New Home Remodel
  • Uncategorized

Adding A Modern Dutch Door To The Laundry Room

  • Jennifer Allwood
  • March 14, 2022
Read More
  • All Posts
  • Beach House
  • DIY Projects
  • Florida Beach House
  • jennifer-allwood-home
  • Uncategorized

Updating The Beach House Kitchen Backsplash

  • Jennifer Allwood
  • February 7, 2022
Jennifer Allwood Kitchen Cabinets
Read More
  • All Posts
  • Beach House
  • Uncategorized

Going Big On The Beach House Kitchen Cabinets

  • Jennifer Allwood
  • January 31, 2022
Jennifer Allwood Home Front door
Read More
  • All Posts
  • Beach House
  • decorating
  • DIY Projects
  • do it yourself
  • Florida Beach House
  • paint
  • Uncategorized

Beefing Up A Front Door In A Small Space

  • Jennifer Allwood
  • January 24, 2022

Leave a Reply

You must be logged in to post a comment.

Jennifer Allwood Home
  • Home
  • Amazon Picks
  • Shop my Instagram
  • New House
  • Old House
  • Hair
  • Recipes
  • Adoption

Input your search keywords and press Enter.

This website uses cookies to improve your experience. We'll assume you're ok with this, but you can opt-out if you wish. Cookie settingsI LOVE COOKIES
Privacy & Cookies Policy

Privacy Overview

This website uses cookies to improve your experience while you navigate through the website. Out of these cookies, the cookies that are categorized as necessary are stored on your browser as they are essential for the working of basic functionalities of the website. We also use third-party cookies that help us analyze and understand how you use this website. These cookies will be stored in your browser only with your consent. You also have the option to opt-out of these cookies. But opting out of some of these cookies may have an effect on your browsing experience.
Necessary
Always Enabled
Necessary cookies are absolutely essential for the website to function properly. This category only includes cookies that ensures basic functionalities and security features of the website. These cookies do not store any personal information.
Non-necessary
Any cookies that may not be particularly necessary for the website to function and is used specifically to collect user personal data via analytics, ads, other embedded contents are termed as non-necessary cookies. It is mandatory to procure user consent prior to running these cookies on your website.
SAVE & ACCEPT